
WE'LL BE HAPPY TO HELP, CALL US TODAY!
215-607-6688
Say Goodbye to Pitted Slabs: The Smart Way to Overlay Your Garage Floor
Say Goodbye to Pitted Slabs: The Smart Way to Overlay Your Garage Floor
Restore a Pitted Garage Floor Without Replacing the Slab
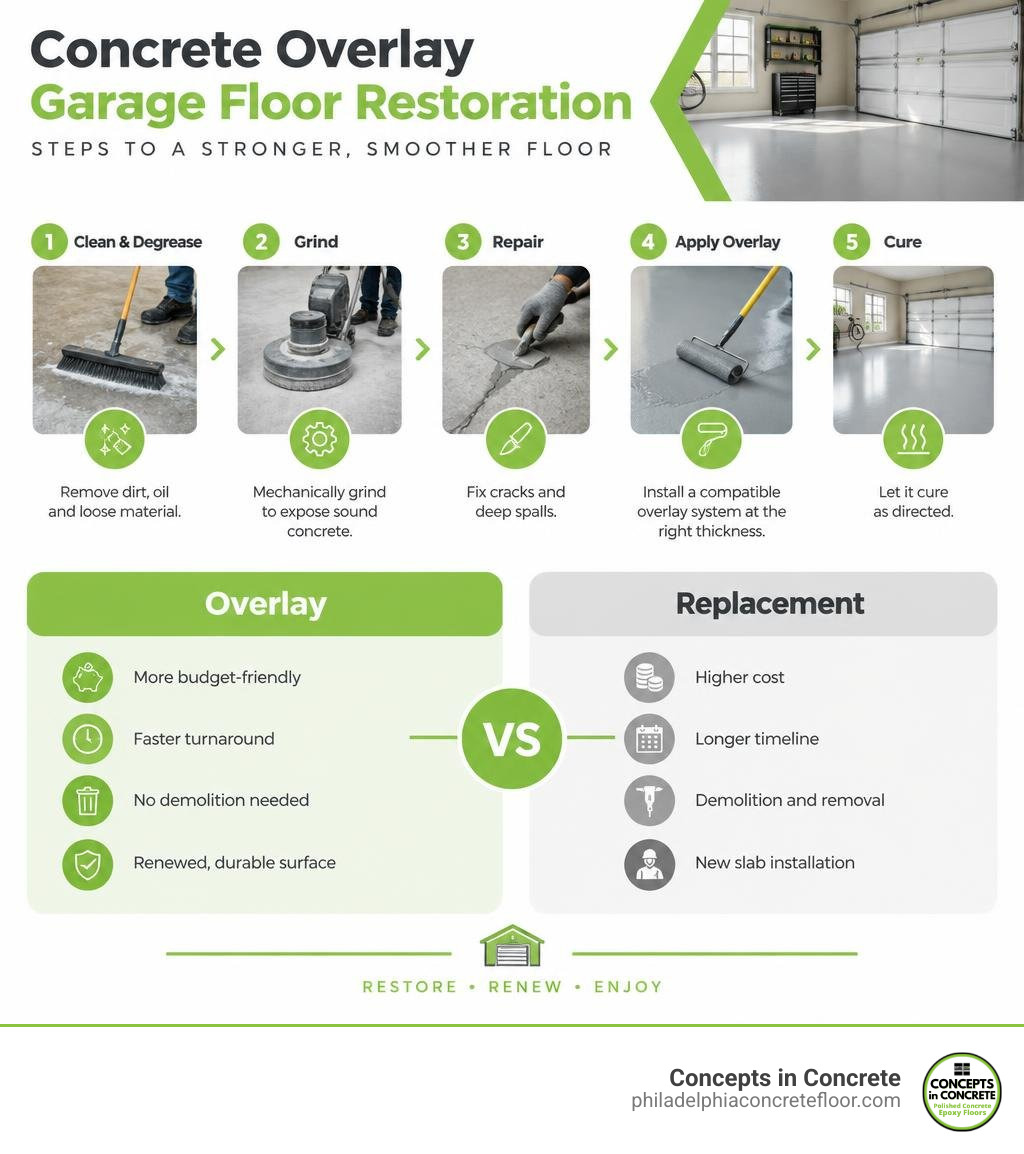
A concrete overlay garage floor is a practical way to restore a pitted, stained, or worn slab without demolition. If the existing concrete is stable, the core process is simple: clean and degrease it, mechanically grind it to expose sound concrete, repair cracks and deep spalls, then apply a compatible overlay system at the right thickness and cure it as directed.
An overlay can renew the surface, improve drainage when designed for re-sloping, and create a clean base for a sealer or epoxy topcoat. It is not the right fix for a slab with major movement, heaving, or unresolved moisture problems. Those issues must be diagnosed first.
I am John Muldoon, President of Concepts in Concrete, with more than 23 years in construction and concrete flooring. Our work on concrete overlay garage floor projects, from residential garages to large warehouses, focuses on the preparation and coating choices that help repaired slabs hold up under traffic, salt, stains, and daily use.
Why Choose a Concrete Overlay Garage Floor Over Full Slab Replacement?
When you walk into your garage and see pitted craters, peeling paint, and stubborn oil spots, your first instinct might be panic. You might wonder if you need a jackhammer and a small army of concrete trucks. In the vast majority of cases, tearing out the slab is unnecessary overkill.
Opting for an overlay preserves the existing structural base while drastically cutting downtime, labor, and budget demands. Demolition means days of deafening noise, dust infiltrating your home, and waiting up to a month for fresh concrete to cure before you can even park a vehicle. A resurfaced floor, on the other hand, restores functionality in days rather than weeks.
When evaluating your options for revitalizing worn garage floors, comparing an overlay against a full slab replacement reveals dramatic operational advantages:
| Factor | Concrete Overlay System | Full Slab Replacement |
|---|---|---|
| Average Cost (per sq. ft.) | $4.00– $10.00 (Standard thin polymer) | Up to 15.00+ |
| Tear-Out & Disposal Fees | None (Zero landfill impact) | High (Heavy equipment & dump fees) |
| Installation Thickness | 1/8″ to 1″ (up to 3.5″ for slopes) | 4″ to 6″ standard slab |
| Foot Traffic Return | 24 to 48 Hours | 3 to 7 Days |
| Vehicle Traffic Return | 48 to 72 Hours | 28 Days (Full cure) |
| Structural Impact | Surface restoration & smoothing | Complete structural rebuild |
Structural Comparison and Cost Breakdown
The financial savings of an overlay system come down to labor and disposal. A full concrete replacement often reaches $6 per square foot or more once you factor in the heavy labor of saw-cutting, sledgehammering, loading debris, and paying regional landfill tipping fees.
By contrast, a thin polymer-modified concrete overlay typically costs around $3.50 to $4.00 per square foot. Decorative stamped finishes generally run from $4 to $8 per square foot. If you are tackling a minor cosmetic fix as a DIY project, the materials for a standard two-car garage can cost less than $200, with total DIY project costs hovering around $300 to $350 including tool rentals.
Beyond cost, pouring an overlay prevents sound concrete from ending up in a landfill. Instead of discarding tons of structural material, we bond a high-strength engineered topping directly to the existing substrate.
Long-Term Benefits and Durability
Modern polymer-modified resurfacers are not basic cement mixes. They contain acrylics, polymers, and fine aggregates engineered to flex slightly under thermal shifts, acting almost like an elastic sweater over the rigid slab. This elasticity prevents the micro-cracking common in standard concrete during seasonal freeze-thaw cycles.
When properly mixed, placed, and maintained with a protective sealer, professional concrete overlays resurfacing delivers a functional lifespan of 10 to 20 years or more. These systems resist road salt, tire friction, and dropped tools with exceptional compressive and tensile strength.
Overlay Systems, Thickness Profiles, and Re-Sloping Options
Selecting the right overlay mix depends on what you need the floor to do. Are you smoothing minor surface scaling, creating a decorative showroom finish, or correcting a back-pitch that sends rainwater pooling against your drywall?

Types of Concrete Overlay Garage Floor Systems
Garage floor resurfacing projects typically use one of four primary systems:
- Thin Polymer-Modified Overlays (Microtoppings): Applied from 1/16-inch to 1/8-inch thick, these formulations create a fresh, clean canvas over lightly spalled concrete. They accept acid stains, integral color, and topical dyes beautifully.
- Self-Leveling Underlayments and Wear Toppings: Formulated to flow freely into low spots, self leveling concrete creates a flat, seamless plane. It cures rapidly with high compressive strength, making it ideal for heavily pitted surfaces.
- Decorative & Stamped Concrete Overlays: Applied at 1/4-inch to 3/4-inch depths, stamped concrete overlays and microtoppings allow us to imprint stone, slate, or brick textures directly onto your existing slab without pouring a full four-inch pad.
- High-Build Epoxy and Polyaspartic Coatings: When maximum chemical resistance is required, installing high-performance epoxy garage floor coatings provides up to 30% better resilience against heavy wear, hot-tire pickup, and automotive fluids compared to unsealed concrete overlays.
Thickness Variations and Correcting Garage Drainage Slopes
A standard resurfacer requires a uniform minimum application thickness of about 1/8 inch across the slab. However, overlays can also correct serious grading defects.
A common structural headache occurs when an older garage slab settles backward, allowing rain and melted snow from vehicles to pool against the interior framing. By varying the application depth of a polymer-modified mortar from 1 inch at the garage door threshold up to 3.5 inches at the rear wall, we can re-establish a proper drainage pitch of 1/8 inch per foot over a 20-foot run.
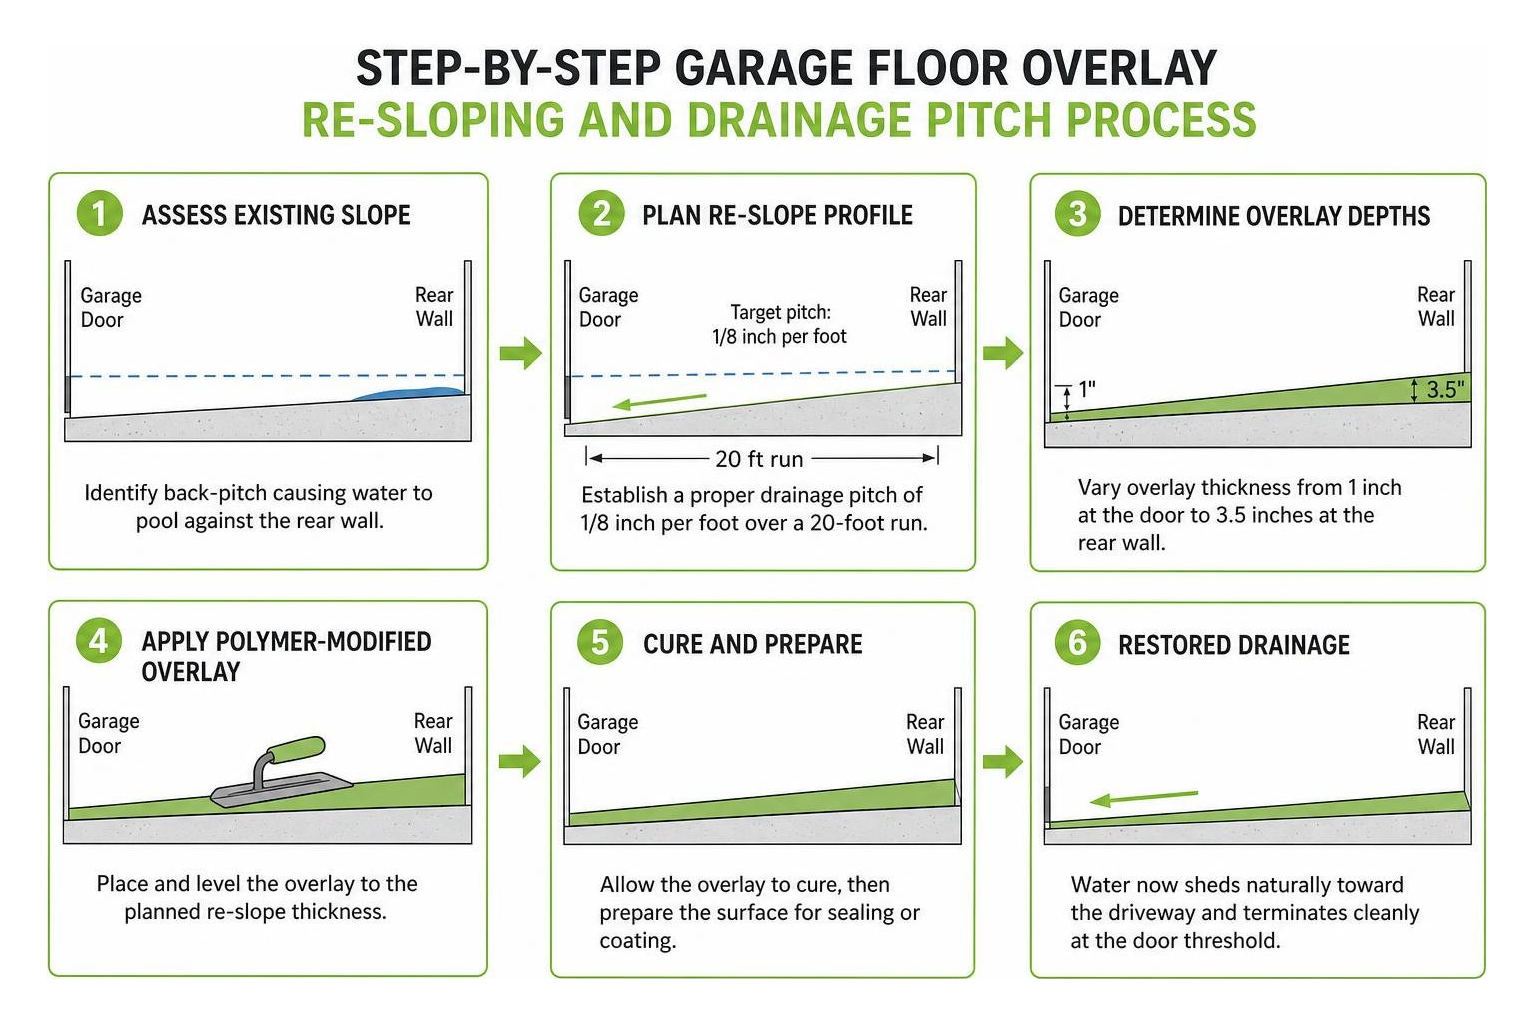
This calculated elevation ensures water sheds naturally toward the driveway while terminating cleanly at existing door sweeps.
Critical Surface Preparation for Pitted and Stained Slabs
The golden rule of concrete resurfacing is absolute: an overlay is only as good as the concrete underneath it. If you pour a high-tech polymer over dirt, motor oil, or flaking concrete, it will bond to the contaminant rather than the slab, causing delamination within months.
Mechanical Profiling, Degreasing, and Crack Repair
Chemical washing alone is rarely enough for a working garage floor. Proper adhesion requires achieving an open, porous Concrete Surface Profile (CSP) of CSP-2 to CSP-3, which feels like medium-grit sandpaper.
Essential surface preparation involves five core steps:
- Deep Degreasing: Scrub the entire slab with an industrial concrete degreaser and a stiff-bristle broom, breaking down embedded motor oil, antifreeze, and grease before rinsing clean.
- Mechanical Abrasion: Grind the slab using a walk-behind diamond grinder or a mechanical scabbler. This removes the weak surface cream (laitance) and opens up the concrete pores.
- Crack Chasing & Routing: Open up all hairline fissures and structural cracks using an angle grinder equipped with a V-shaped diamond blade.
- Rigid Patching: Fill routed cracks, divots, and deep spalls using a high-strength epoxy repair mortar or polymer patch, troweling flush with the surrounding concrete profile.
- Moisture Vapor Testing: Conduct a simple calcium chloride test or plastic-sheet condensation test. If moisture vapor transmission exceeds 5 lbs per 1,000 sq. ft. per 24 hours, apply an epoxy moisture vapor barrier before installing the overlay.
Applying Overlays Over Existing Epoxy and Oil Contaminants
Homeowners frequently ask if they can pour an overlay directly over an old coat of peeling hardware-store epoxy. The short answer is no. Overlays require a direct mechanical bond with open concrete capillaries. You must completely grind off prior epoxy coatings down to bare aggregate before proceeding.
For oil-saturated areas, deep mechanical grinding followed by a penetrating polymer bonding primer ensures the new topping creates a secure structural bond with the cleaned substrate.
Execution: Pouring, Finishing, and Long-Term Protection
Once the slab is profiled, cleaned, and primed, timing is critical. Cement-based resurfacing products set rapidly, especially in warm weather. Working in manageable sections with a coordinated team ensures a uniform, professional finish.
Step-by-Step Concrete Overlay Garage Floor Application
To achieve an even application without ridges or cold joints, follow this systematic workflow:
- Set Edge Dams: Place a heavy-duty vinyl weather strip or foam dam across the garage door threshold to keep wet material from spilling onto the driveway.
- Mix Thoroughly: A standard 80-pound bag of overlay mix covers approximately 100 square feet at 1/8-inch thickness (or roughly 50 square feet per 40-pound bag). Mix with clean water using a high-torque power mixer for two minutes, let the material slake (rest) for two minutes, then give it a final 30-second mix to eliminate lumps.
- Spread with Precision: Pour the material across the prepared slab in ribbons. Use a gauge rake set to your target depth to distribute the overlay, followed by a flexible floor squeegee to smooth out lap lines.
- Apply Traction Texture: Within five minutes of placement—before the material begins its initial set—pull a clean, damp push-broom lightly across the wet overlay in parallel strokes to impart a durable, slip-resistant broom finish.
- Honor Control Joints: Never fill over active slab control joints. Within 12 to 24 hours of pouring, saw-cut along the existing joint lines with a diamond blade to prevent stress cracks from telegraphing up into your new surface.
Curing, Protective Topcoats, and Mistakes to Avoid
Proper curing dictates the final hardness of your floor. In warm or dry conditions, cover the fresh overlay with clean plastic sheeting or apply a light water mist for the first 24 to 48 hours to retain essential hydration.
Avoid these common installation missteps:
- Applying the overlay in direct sunlight on hot days, which causes flash-drying and surface checking.
- Over-watering the mix, which weakens the cured compressive strength.
- Failing to honor expansion joints, leading to random cracking down the road.
After the overlay has cured for at least 48 to 72 hours, lock in protection with a durable topcoat. While standard acrylic sealers offer baseline stain resistance, pairing your overlay with professional-grade protective coatings unlocks superior long-term performance. You can review the complete list of high-performance epoxy garage floor coating benefits to see how a seamless clear topcoat defends against hot-tire pickup, corrosive de-icing salts, and chemical spills.
Frequently Asked Questions About Garage Concrete Resurfacing
How long does a garage concrete overlay last?
When applied over a structurally sound, diamond-ground substrate and maintained with a protective sealer, a polymer-modified concrete overlay lasts between 10 and 20 years. Re-applying a clear protective sealer every three to four years preserves the surface against vehicular traffic, UV exposure, and moisture penetration.
Can I apply a polymer overlay over existing epoxy coatings?
No. Polymer and cementitious overlays require open, porous concrete pores to anchor mechanically. Applying an overlay directly over old epoxy, paint, or chemical sealers leads to delamination under vehicle weight. All previous coatings must be removed by mechanical diamond grinding or shot-blasting down to clean, bare concrete before installing the overlay.
How much does it cost to resurface a two-car garage slab?
For a typical 400–500 sq. ft. two-car garage in the Philadelphia/South Jersey area:
- Basic cement-based resurfacing: approximately $2,000–$5,000
- Decorative overlay: approximately $3,500–$8,000+
- Grinding, crack repair and epoxy-flake/polyaspartic system: approximately $3,500–$5,500
- Heavy spalling or extensive slab repairs: potentially $5,000–$9,000
- Complete removal and replacement: often $6,000–$12,000+
Local concrete resurfacing generally runs around $5–$10 per square foot, while decorative systems can reach $20 or more per square foot.
The biggest price factors are the amount of grinding, crack and joint repairs, moisture problems, surface deterioration, and the finish selected. If the slab is heaving, sinking, or has moving structural cracks, resurfacing may not last and replacement could be the better investment.
Conclusion
A pitted, spalling garage floor does not mean you are stuck with costly slab demolition. By mechanically profiling the substrate, repairing underlying cracks, and applying a high-performance polymer-modified overlay, you can restore your garage floor to a smooth, resilient condition built for years of heavy traffic.
With over two decades of experience serving residential, commercial, and industrial properties across Philadelphia, Bucks County, and South Jersey, Concepts in Concrete delivers dependable floor transformations engineered to last. Whether you need deep slab restoration, self-leveling drainage corrections, or custom decorative finishes, our team ensures every square foot receives proper mechanical profiling and seamless material bonding.
Ready to revitalize your damaged garage slab? Contact Concepts in Concrete today to schedule an on-site consultation with a certified epoxy floor installer and explore our long-lasting epoxy garage floor coatings.
Call us today at 215-607-6688 or Contact Us by email
© 2004-2026 Concepts in Concrete Bristol PA | All Rights Reserved | Powered by Rettig Digital