
WE'LL BE HAPPY TO HELP, CALL US TODAY!
215-607-6688
Cement Paint for Garage Floors in Philadelphia: Is It Worth It?
Cement Paint for Garage Floors in Philadelphia: Is It Worth It?
Why Diamond Grinding and 2-Part Epoxy Outperform Garage Floor Paint
Cement paint for a garage floor can improve the look of a light-use space, but it is primarily a thin cosmetic film—not a long-term protection system for a busy garage. For homeowners in Philadelphia and nearby Bucks County communities, winter road salt, wet vehicles, and frequent temperature changes can make surface preparation and coating selection especially important. Standard concrete paint and many single-part “epoxy paints” dry as the water or solvent evaporates. They can look clean at first, yet they are more vulnerable to hot-tire pickup, moisture pressure, dropped tools, road salt, and automotive fluids.
For a garage that sees daily vehicles, workshop activity, or frequent spills, the more durable approach is mechanical diamond grinding followed by a true 2-part epoxy system. Diamond grinding removes weak surface paste, old failing coatings, and embedded contaminants while opening a consistent concrete profile. That profile gives the epoxy a sound, textured surface to grip, rather than asking a thin paint film to adhere to smooth or contaminated concrete.
Standard latex or acrylic concrete paints are simple waterborne systems. They dry through evaporation and leave behind a relatively thin plastic film. They can be a reasonable short-term choice for low-traffic utility areas, but they do not create the chemically crosslinked protective layer that a true 2-part epoxy creates.
A 1-part epoxy paint is usually an acrylic-based coating with epoxy additives already blended into the can. It offers easier cleanup and somewhat better resistance than ordinary paint, but it still cures largely by drying and air exposure. It is not the same product category as a mixed resin-and-hardener coating.
True commercial-grade protection relies on multi-component systems, specifically 2-part epoxy coatings. In a 2-part system, a base resin reacts with a hardener to form a tightly crosslinked thermoset coating. The result is a thicker, more chemically resistant surface with stronger adhesion and better resistance to abrasion, hot tires, and routine garage use. Specialized polyurea, polyaspartic, and polyurethane systems can also be used where faster cure times, UV stability, or exceptional impact resistance are priorities.
| Chemistry Type | Typical Solids Content | Curing Mechanism | Hot-Tire Resistance | Expected Lifespan | Best Use Case |
|---|---|---|---|---|---|
| Acrylic Masonry Paint | 25% – 35% | Physical drying / evaporation | Poor | 1 – 2 years | Patios, walkways, low-traffic utility sheds |
| 1-Part Acrylic Epoxy | 30% – 45% | Evaporation & air oxidation | Moderate | 2 – 4 years | Light-use residential garages |
| 2-Part Waterborne Epoxy | 45% – 60% | Chemical crosslinking | Good to Very Good | 4 – 8 years | Everyday residential garages |
| 2-Part 100% Solids Epoxy | 95% – 100% | Full thermoset polymerization | Excellent | 15+ years | Heavy-duty residential, commercial, and industrial floors |
| Polyurea / Polyaspartic Systems | Varies by system | Rapid catalytic cure | Superior | 10 – 15+ years | High-traffic garages and workshops |
Why a True 2-Part Epoxy Holds Up Better Than Paint
The biggest functional difference between paint and a professional epoxy system is not just the label—it is the surface preparation, film build, and chemical cure. A typical paint application creates only a few mils of protection. A properly specified epoxy system can build a substantially thicker protective layer while penetrating and locking into a mechanically prepared concrete profile.
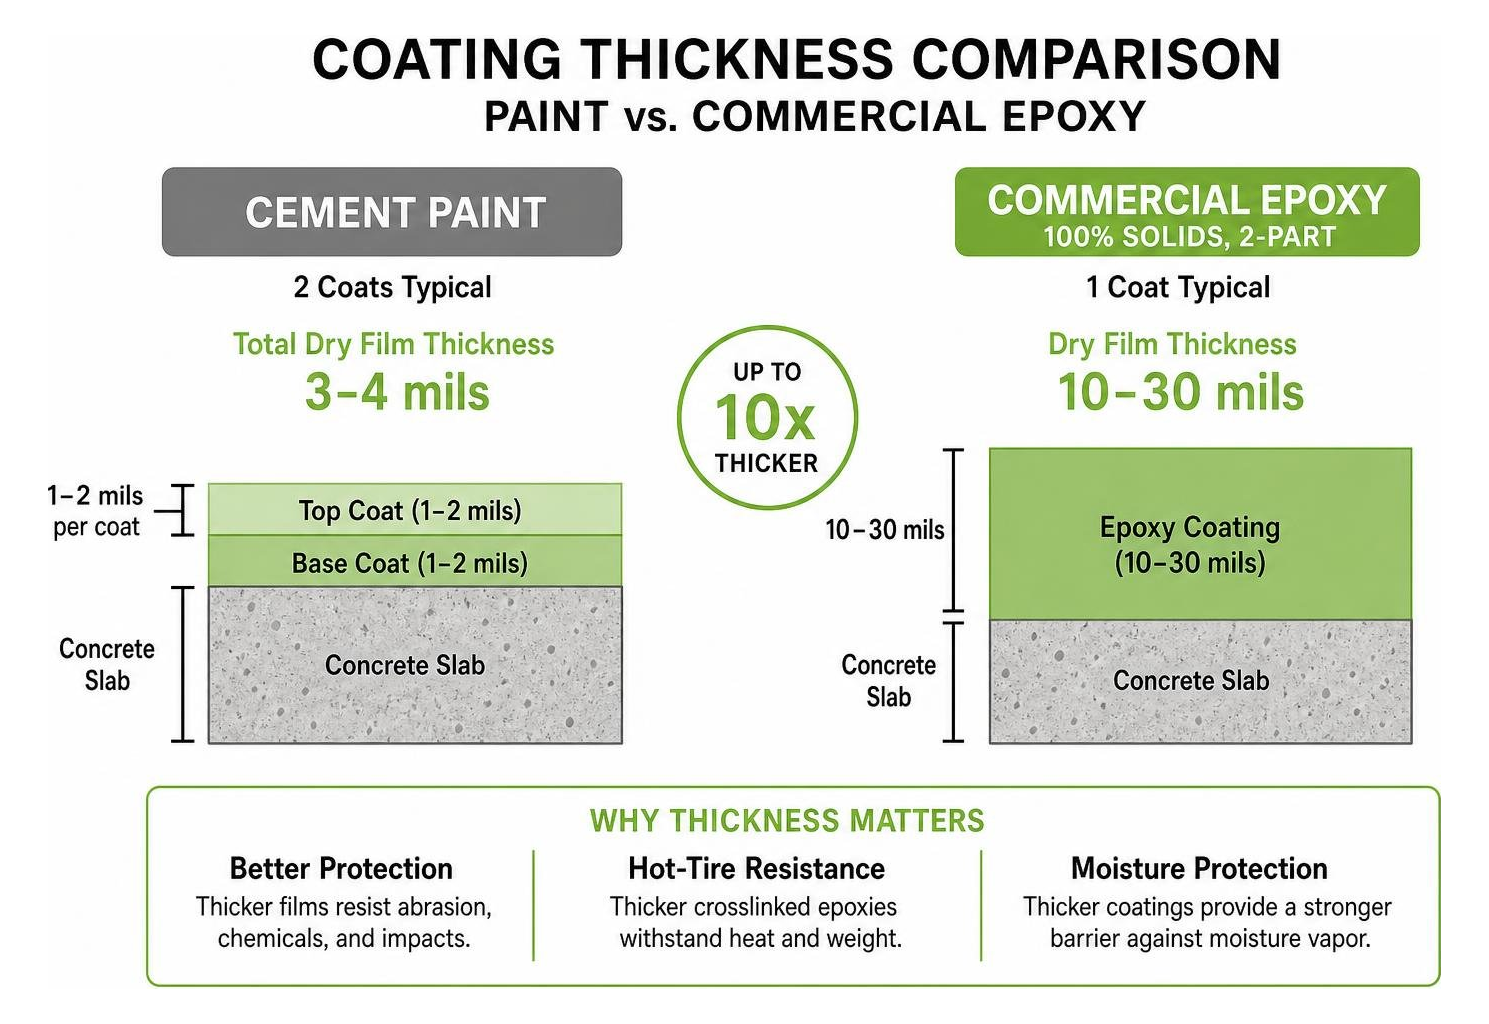
That added film thickness and crosslink density matter when a hot vehicle tire sits on the floor. Heat, weight, and tire plasticizers can soften or pull at a thin paint film. A properly installed 2-part epoxy system is far more resistant because it cures into a harder, more cohesive layer that is mechanically bonded to profiled concrete. The long-term epoxy garage floor coating benefits come from this combination of preparation, adhesion, thickness, and chemistry—not simply from applying a product called “epoxy.”
Concrete also transmits moisture vapor. When a coating is applied over an inadequately prepared slab or a slab with excessive moisture, pressure beneath the coating can cause blistering and delamination. Proper moisture evaluation and professional preparation reduce that risk before the epoxy is installed.
Choosing the Right Cement Paint for Garage Floor Applications
If you decide that a single-part or light-duty coating fits your budget and lifestyle, selecting the right formulation requires matching product features to how you actually use your space.
A single-pack system like a tinted acrylic epoxy offers convenience, but you must evaluate factors such as vehicle weight, fluid spills, exposure to sunlight through open garage doors, and slip hazards during rainy weather.
Essential Resistance Features and Sheen Options
When shopping for garage coatings, look for specific performance ratings on the technical data sheet:
- Hot-Tire Pickup Resistance: Formulations must state hot-tire resistance directly. Standard porch and patio paints will fail under heated radials.
- Chemical & Petroleum Resistance: The coating should resist motor oil, transmission fluid, gasoline, brake fluid, and road deicing salts without staining or softening.
- UV Stability: Acrylic-based paints and aliphatic polyurethanes resist yellowing from sunlight exposure, whereas standard indoor aromatic epoxies can amber over time when exposed to direct sun.
- Slip Resistance: Wet, smooth paint is exceptionally slick. Ensure you mix an aluminum oxide or polymer anti-skid additive into your final coat.
Sheen levels also affect maintenance and aesthetics. Gloss finishes reflect light beautifully, making dark garages brighter and easier to wipe down, but they highlight surface imperfections. Satin and semi-gloss sheens offer a balanced alternative, diffusing glare while masking minor concrete pitting. For homeowners seeking visual flair without metallic epoxy, specialized acrylic coatings can create an attractive shimmer across concrete surfaces.
Coverage Rates and Recommended Coat Counts
Never stretch garage paint thinner than the manufacturer directs. Doing so prevents proper film formation and accelerates wear.
Standard 1-part epoxy paints provide coverage between 350 to 500 sq ft per gallon on smooth concrete. On rough, porous, or heavily etched surfaces, coverage drops to 300 to 400 sq ft per gallon.
We always recommend applying a minimum of two coats. The first coat acts as a penetrative anchor into the concrete’s pores, while the second coat builds the protective wear layer and eliminates roller lap marks. For a standard 400 sq ft two-car garage, plan on purchasing at least two to three gallons to ensure adequate dry film thickness. Use a high-quality, shed-resistant 3/8-inch nap roller on smooth to medium slabs, or a 1/2-inch nap roller on rougher profiles.
Diamond Grinding: The Foundation for a Long-Lasting Epoxy Floor
A durable garage floor starts with the concrete—not with the coating can. Even the best 2-part epoxy can fail when it is applied over weak surface paste, oil contamination, smooth troweled concrete, or loose old paint. That is why diamond grinding is the preferred preparation method for a high-performance epoxy installation. In Philadelphia-area garages, where vehicles may track in rain, snowmelt, and road salt, removing contaminants and establishing a reliable concrete profile is particularly important.
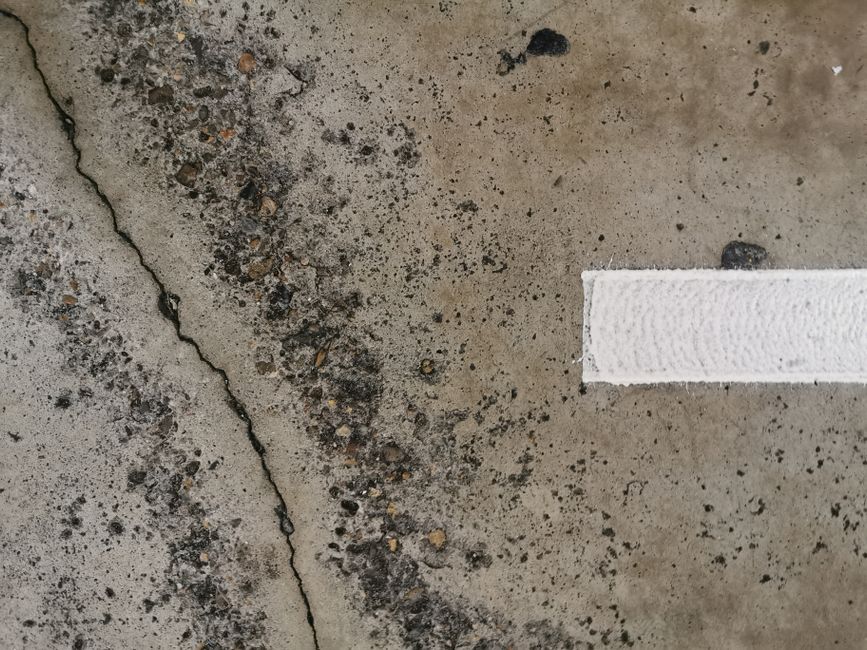
Diamond grinders use industrial diamonds to cut away the weak, contaminated top layer of concrete and create a clean, evenly textured profile. Unlike a simple acid wash, grinding physically removes many adhesion barriers instead of relying on a chemical reaction alone. It also gives installers greater control over the surface profile needed for the selected epoxy system.
Key Benefits of Diamond Grinding Before Applying 2-Part Epoxy
Diamond grinding delivers several important advantages:
- Removes weak surface paste: The top layer of concrete can be dusty, soft, or poorly bonded. Grinding exposes stronger concrete that can support a durable coating.
- Improves mechanical adhesion: The grinder creates a controlled texture, often described by Concrete Surface Profile standards. Epoxy flows into this profile and cures into the concrete surface rather than simply sitting on top of it.
- Strips failing coatings and contaminants: Old paint, flaking sealers, tire residue, and surface-level oils can undermine a new floor. Mechanical removal is more reliable than coating over questionable material.
- Levels minor imperfections: Grinding can reduce rough patches, previous coating edges, and small surface irregularities so the finished epoxy looks more uniform.
- Avoids acid-etching residue: Acid etching can work for certain light-duty applications when performed correctly, but it requires thorough neutralization, rinsing, and drying. Diamond grinding avoids leaving acidic residues or introducing excess water into the slab.
- Creates a cleaner installation path: Professional equipment is typically paired with dust collection to help contain concrete dust and leave the floor ready for detailed repairs and coating work.
Moisture Testing, Repairs, and Final Surface Readiness
Before applying a 2-part epoxy system, the floor should be evaluated for moisture, cracks, and contamination:
- Moisture evaluation: A simple plastic-sheet test can reveal obvious moisture concerns, while professional moisture testing provides more dependable measurements when a high-build coating is planned. If moisture vapor is excessive, the coating system must be selected accordingly before installation.
- Degreasing and contaminant removal: Heavy oil or grease should be treated before grinding. Grinding is highly effective for surface contamination, but deeply saturated areas may need additional remediation.
- Diamond grinding: Grind the entire floor to remove weak material and create an even profile. Edges, corners, and repairs should receive the same attention as the center of the slab.
- Crack and joint repair: Fill nonmoving cracks and surface defects with a compatible repair material after preparation. Expansion and control joints may require a different treatment so the floor can still move as intended.
- Vacuuming and final inspection: Remove all dust and confirm that the concrete is clean, dry, sound, and consistently profiled before mixing the epoxy.
Recoating Previously Painted or Stained Concrete
A new epoxy floor should not be installed over paint that is peeling, soft, or poorly bonded. First, test suspect areas for adhesion. If the old coating releases easily, it should be mechanically removed rather than buried beneath a new system.
For previously coated garages, diamond grinding is especially valuable because it can remove failing paint, dull glossy areas, feather old coating edges, and expose a reliable surface for the epoxy. After grinding, the installer can identify cracks, spalls, moisture concerns, and remaining contaminants before they become expensive coating failures. This preparation-first approach is essential when planning epoxy floors and decorative concrete for garages and basements.
Application Process, Tool Selection, and Cure Times
Once the floor has been diamond ground, cleaned, repaired, and approved for coating, a true 2-part epoxy system can be applied for a more durable garage floor finish.
Applying a 2-Part Epoxy Garage Floor System
- Confirm site conditions: Follow the product manufacturer’s requirements for slab temperature, air temperature, humidity, and moisture. Concrete that is too cold, damp, or contaminated can interfere with adhesion and cure.
- Mix only what can be applied within the pot life: A 2-part epoxy begins reacting once the resin and hardener are combined. Mix each batch thoroughly and apply it within the stated working time.
- Cut in edges and details: Use the recommended brush or roller to coat the perimeter, joints, and difficult areas before rolling the main field.
- Apply at the specified coverage rate: Do not stretch the material farther than the system calls for. Proper coverage helps achieve the intended film build, color consistency, and protective performance.
- Broadcast flakes or anti-slip media when specified: Decorative chips can improve appearance, while an appropriate anti-slip additive can improve traction on a wet garage floor.
- Use a compatible topcoat when needed: A polyurethane or polyaspartic topcoat can add UV stability, scratch resistance, and easier cleaning, depending on the selected system.
Drying Windows and Vehicle Return-to-Service Timelines
Patience during curing makes the difference between a floor that performs and one that is damaged before it has fully hardened. A 2-part epoxy may feel dry before it has reached its full chemical cure.
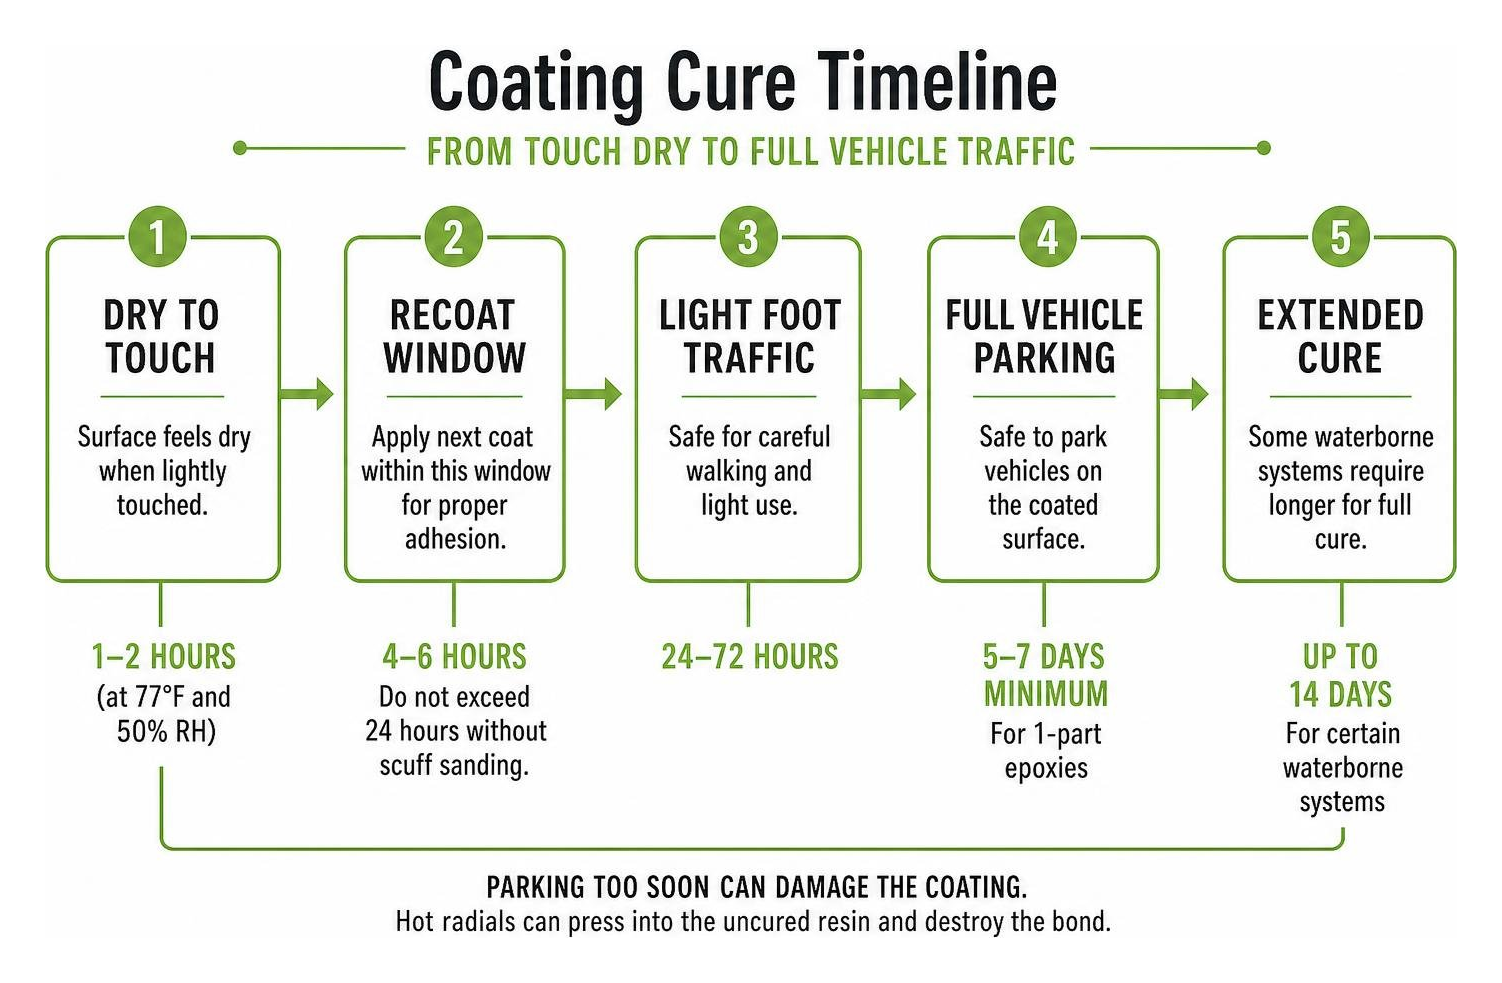
Always follow the specific product data sheet, but a typical sequence includes:
- Dry to touch: Often within several hours, depending on the product and conditions.
- Recoat window: Usually within the manufacturer’s stated interval, before the first layer becomes too hard for good intercoat adhesion.
- Light foot traffic: Commonly after about 24 hours, depending on temperature and product chemistry.
- Vehicle traffic: Often several days after installation. Full return to service should wait until the coating has reached the manufacturer’s required cure level.
Parking too early can leave tire marks, compromise adhesion, or damage the new coating. Giving a professionally prepared 2-part epoxy system enough time to cure protects the investment.
Frequently Asked Questions About Garage Concrete Coatings
What causes hot tire pickup on painted garage floors?
Hot tire pickup occurs when heated tires from driving soften a low-crosslink paint film. As the vehicle sits, the weight and residual heat cause tire plasticizers to bond with the paint. When you drive away, the cooling tire has a stronger grip on the paint than the paint has on the concrete, peeling the coating up in chunks.
Can I apply garage paint directly without acid etching or grinding?
No. Smooth-troweled concrete has closed pores that prevent liquid paint from penetrating and forming a mechanical bond. Applying paint directly to un-etched, smooth concrete will almost certainly cause widespread delamination and peeling within months.
How long must new concrete cure before painting?
New concrete must cure for a minimum of 28 to 30 days before applying any paint, primer, or epoxy. During this hydration period, moisture leaves the slab and the concrete’s high alkalinity stabilizes. Applying a coating too early traps moisture and risks chemical degradation from high pH levels.
Conclusion
Cement paint and single-part garage coatings can refresh the appearance of a lightly used floor, but they are not designed to deliver the same long-term protection as a mechanically prepared 2-part epoxy system. For garages in Philadelphia and the surrounding Bucks County area that are exposed to daily vehicles, hot tires, road salt, tools, chemicals, and seasonal moisture, the preparation method matters as much as the coating itself.
Diamond grinding gives epoxy the clean, strong, textured concrete surface it needs to bond correctly. Combined with a true resin-and-hardener epoxy, it produces a thicker, tougher, more durable finish than paint can provide. At Concepts in Concrete, we use preparation-first methods to help property owners throughout Philadelphia, Doylestown, Yardley, Newtown, Richboro, Bristol, Levittown, and Fairless Hills move beyond peeling floor paint and into durable, professional-grade surfaces. For long-lasting residential or commercial protection, professionally installed epoxy garage floor coatings offer the adhesion, chemical resistance, and performance a working garage floor demands.
Call us today at 215-607-6688 or Contact Us by email
© 2004-2026 Concepts in Concrete Bristol PA | All Rights Reserved | Powered by Rettig Digital